You must configure all Windows domain endpoints–domain controllers and computers in a Windows domain–that will be issued certificates by Certificate Enrollment Gateway.
For WSTEP enrollment, some machines also need TLS certificates. You will be configuring the TLS certificates later, starting in Configuring the TLS certificate of the Windows endpoints.
- Enabling certificate auto-enrollment for users
- Enabling certificate auto-enrollment for computers and domain controllers
- Configuring the Certificate Enrollment Policy Web Service for Windows users
- Configuring the Certificate Enrollment Policy Web Service for Windows domain endpoints
- Importing the CA certificate into Windows domain endpoints
- Obtaining the URL of the Certificate Enrollment Policy Web Service
Enabling certificate auto-enrollment for users
In the Windows Domain, enable the certificate auto-enrollment for users.
To enable the certificate auto-enrollment for users
- Log in to the server hosting Active Directory.
- Open the Group Policy Management administrative tool. Select Start > Windows Administrative Tools > Group Policy Management.
The Group Policy Management dialog box appears.
- In the tree view, expand the Domain Controller you will modify.
- Right-click Default Domain Policy > Edit. The Group Policy Management Editor dialog box appears.

- Expand User Configuration > Policies > Windows Settings > Security Settings > Public Key Policies.
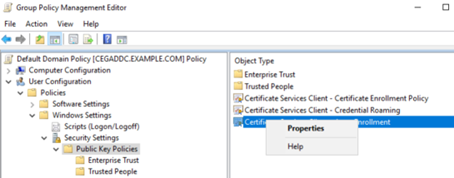
- In the content pane, right-click Certificate Services Client Auto Enrollment > Properties.
The Certificate Services Client Auto Enrollment Properties dialog box appears.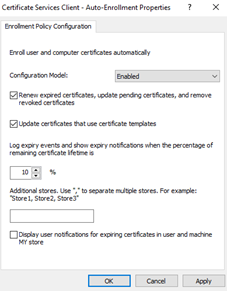
- In the Configuration Model drop-down list, select Enabled.
- Select Renew expired certificates, update pending certificates, and remove revoked certificates.
- Select Update certificates that use certificate templates.
- Click OK.
Enabling certificate auto-enrollment for computers and domain controllers
In the Windows domain, enable the certificate auto-enrollment for computers and domain controllers.
To enable certificate auto-enrollment for computers and domain controllers
- Log in to the server hosting Active Directory.
- Open the Group Policy Management administrative tool. Select Start > Windows Administrative Tools > Group Policy Management.
The Group Policy Management dialog box appears.
- In the tree view, expand the Domain Controller you will modify.
- Right-click Default Domain Policy > Edit.
The Group Policy Management Editor dialog box appears.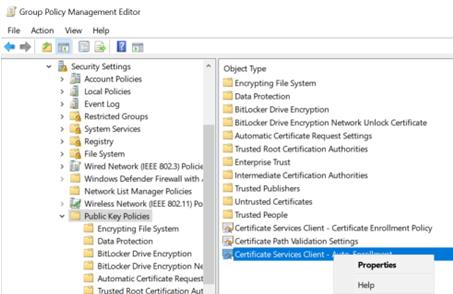
- Expand to Computer Configuration > Policies > Windows Settings > Security Settings > Public Key Policies.
- In the content pane, right-click Certificate Services Client Auto Enrollment > Properties.
The Certificate Services Client Auto Enrollment Properties dialog box appears.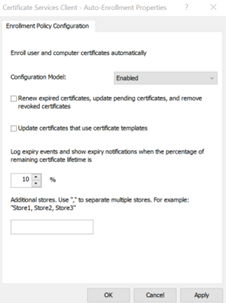
- In the Configuration Model drop-down list, select Enabled.
- Select Renew expired certificates, update pending certificates, and remove revoked certificates.
- Select Update certificates that use certificate templates.
- Click OK.
Configuring the Certificate Enrollment Policy Web Service for Windows users
To work with Certificate Enrollment Gateway, Windows domain endpoints need the Certificate Enrollment Policy Web Service URL. Complete the following procedure to add the Certificate Enrollment Policy Web Service URL to Windows domain endpoints.
To configure the Certificate Enrollment Policy Web Service for Windows users
- Log in to the server hosting Active Directory.
- Open the Group Policy Management administrative tool. Select Start > Windows Administrative Tools > Group Policy Management.
The Group Policy Management dialog box appears.
- In the tree view, expand the Domain Controller you will modify.
- Right-click Default Domain Policy > Edit .
The Group Policy Management Editor dialog box appears.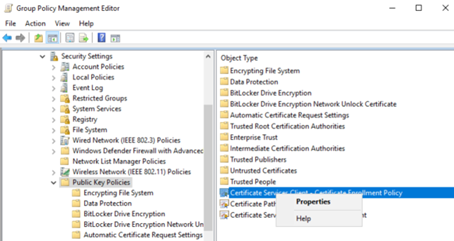
- In the tree view, expand User Configuration > Policies > Windows Settings > Security Settings > Public Key Policies.
- In the content pane, right-click Certificate Services Client - Certificate Enrollment Policy > Properties.
The Certificate Services Client - Certificate Enrollment Policy Properties dialog box appears.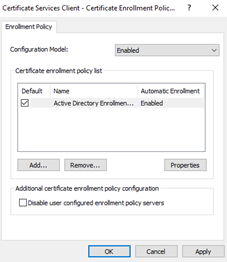
- In the Configuration Model drop-down list, select Enabled.
- If you are not installing WSTEP along with an existing Microsoft CA, select Active Directory Enrollment in the Certificate enrollment policy list pane, and then click Remove.
- Click Add. The Certificate Enrollment Policy Server dialog box appears.

- In the Enter enrollment policy server URI field, enter the Certificate Enrollment Policy Web Service URL that you obtained earlier.
- In the Authentication type drop-down list, select the same authentication mode that you configured earlier in Selecting the authentication mode of the CEP Web Service using the Windows graphical interface.
- Click Validate Server. If the selected authentication type is Username/password, you will be prompted for the username and password of the user logged in to the computer.

- Click Add.
The Certificate enrollment policy list pane should display the friendly name of the Certificate Enrollment Policy Web Service that you specified earlier in Assigning a friendly name to the CEP Web Service using the Windows graphical interface.
- In the Certificate enrollment policy list pane, select the checkbox for the Certificate Enrollment Policy Web Service you just added to make it the default Certificate Enrollment Policy.
- Click OK.
Configuring the Certificate Enrollment Policy Web Service for Windows domain endpoints
To work with Certificate Enrollment Gateway, Windows domain endpoints need the Certificate Enrollment Policy Web Service URL. Complete the following procedure to add the Certificate Enrollment Policy Web Service URL for Windows domain endpoints.
To configure the Certificate Enrollment Policy Web Service for Windows domain endpoints
- Log in to the server hosting Active Directory.
- Open the Group Policy Management administrative tool. Select Start > Windows Administrative Tools > Group Policy Management. The Group Policy Management dialog box appears.

- In the tree view, expand the Domain Controller you will modify.
- Right-click Default Domain Policy > Edit. The Group Policy Management Editor dialog box appears.
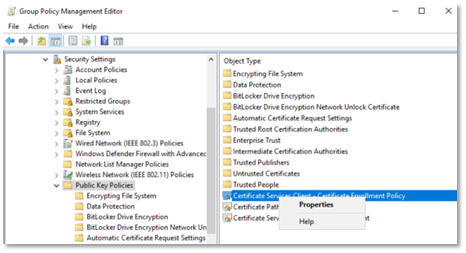
- In the tree view, expand Computer Configuration > Policies > Windows Settings > Security Settings > Public Key Policies.
- In the content pane, right-click Certificate Services Client - Certificate Enrollment Policy > Properties.
The Certificate Services Client - Certificate Enrollment Policy Properties dialog box appears.
- In the Configuration Model drop-down list, select Enabled.
- If you are not installing WSTEP along with an existing Microsoft CA, select Active Directory Enrollment in the Certificate enrollment policy list pane, and then click Remove.
- Click Add.
The Certificate Enrollment Policy Server dialog box appears.
- In the Enter enrollment policy server URI field, enter the Certificate Enrollment Policy Web Service URL that you obtained earlier.
- In the Authentication type drop-down list, select the same authentication mode that you configured earlier in Selecting the authentication mode of the CEP Web Service using the Windows graphical interface.
- Click Validate Server. If the selected authentication type is Username/password, you will be prompted for the username and password of the user logged in to the computer.
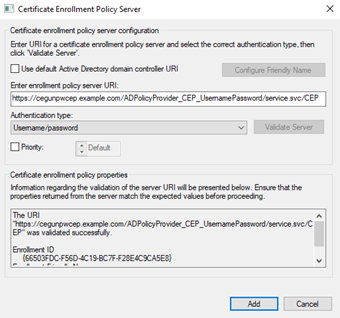
- Click Add.
The Certificate enrollment policy list pane should display the friendly name of the Certificate Enrollment Policy Web Service that you specified earlier in Assigning a friendly name to the CEP Web Service using the Windows graphical interface.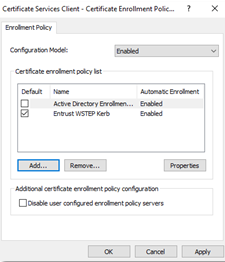
- In the Certificate enrollment policy list pane, select the checkbox for the Certificate Enrollment Policy Web Service you just added to make it the default Certificate Enrollment Policy.
- Click OK.
Importing the CA certificate into Windows domain endpoints
In each Windows domain enrollment endpoint, import the root certificate of the CA that will issue certificates for the enrollment service.
To import the CA certificate
- Log in to the server hosting Active Directory.
- Open the Group Policy Management administrative tool. Select Start > Windows Administrative Tools > Group Policy Management.
The Group Policy Management dialog box appears.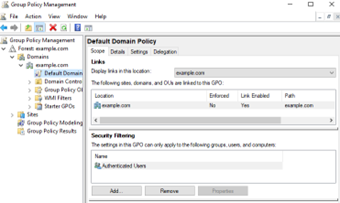
- In the tree view, expand the Domain Controller you will modify.
- Right-click Default Domain Policy > Edit. The Group Policy Management Editor dialog box appears.
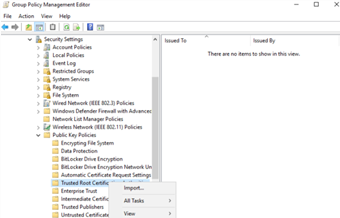
- In the tree view, expand Computer Configuration > Policies > Windows Settings > Security Settings > Public Key Policies.
- Right-click Trusted Root Certification Authorities and select Import.
The Certificate Import Wizard dialog box appears.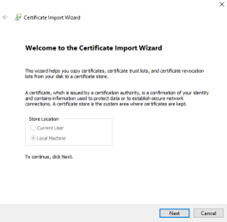
- Click Next.
The File to Import page appears.
- Click Browse and select the root certificate of the CA that will issue certificates for the enrollment service.
- Click Next.
The Certificate Store page appears. - The Certificate Store field is automatically set to Trusted Root Certification Authorities. Click Next.
The Completing the Certificate Import Wizard page appears. - Click Finish.
Obtaining the URL of the Certificate Enrollment Policy Web Service
To work with Certificate Enrollment Gateway, Windows domain endpoints need the Certificate Enrollment Policy Web Service URL. To obtain the URL, complete the following procedure.
To obtain the URL of the Certificate Enrollment Policy Web Service
- Log in to the server hosting the Certificate Enrollment Policy Web Service.
- Open IIS Manager. Select Start > Windows Administrative Tools > Internet Information Services (IIS) Manager.
The Internet Information Services (IIS) Manager dialog box appears.
- In the Connections pane, expand Sites > Default Web site.
- Select the name of the Certificate Enrollment Policy Web Service application.
- If you configured user name and password authentication for the Certificate Enrollment Policy Web Service, the identifier is ADPolicyProvider_CEP_UsernamePassword.
- If you configured Kerberos (Windows integrated) authentication for the Certificate Enrollment Policy Web Service, the identifier is ADPolicyProvider_CEP_Kerberos.
- In the Features pane, double-click Application Settings.
The Application Settings pane appears.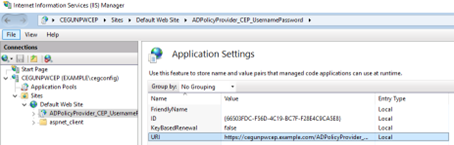
- In the Application Settings pane, right-click URI > Edit.
The Edit Application Setting dialog box appears.
- Copy the URL from the Value field.