Enrollment endpoints outside the Windows domain require the manual configuration described in this section.
Configuring the enrollment policy in non-domain endpoints
In the enrollment endpoints outside the Windows Domain, add the enrollment policy as described in the following procedure.
To configure the enrollment policy in non-domain endpoints
- Log in to the non-domain endpoint.
- Run
mmc.exe.
The Microsoft Management Console appears.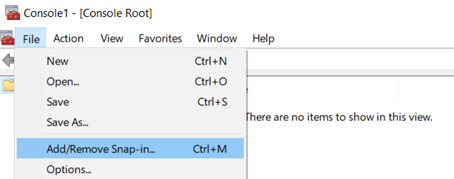
- Select File > Add/Remove Snap-in.
The Add/Remove Snap-ins dialog box appears.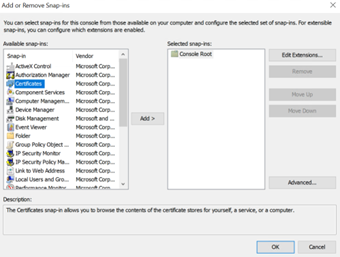
- In the Available snap-ins list, select Certificates.
- Click Add.
The Certificates snap-in dialog box appears.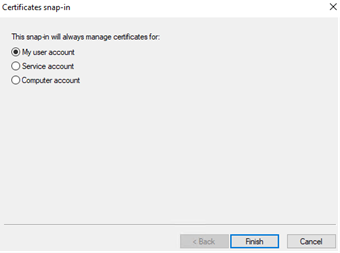
- Select My user account.
- Click Finish to close the Certificates snap-in dialog box.
- Click OK to close the Add or Remove Snap-ins dialog box.
- In the tree view, expand Console Root > Certificates – Current User > Personal.
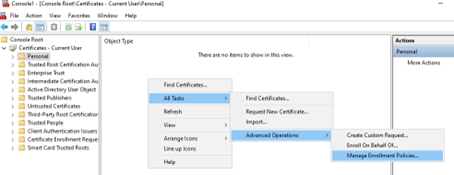
- Right-click Personal > All Tasks > Advanced Operations > Manage Enrollment Policies.
The Manage Enrollment Policies dialog box appears.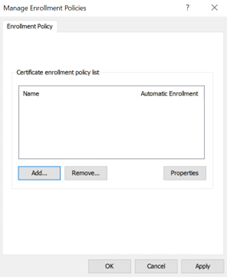
- Click Add.
The Certificate Enrollment Policy Server dialog box appears.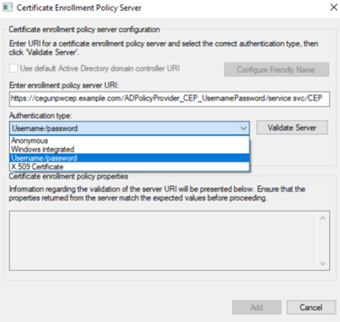
- In the Enter enrollment policy server URI field, enter the URL of the Certificate Enrollment Policy Web Service that you obtained earlier in Configuring Windows Domain Endpoints.
- In the Authentication Type drop-down list, select Username/Password.
- Click Validate Server.
- When prompted, authenticate with your Windows user name and password.
- Click Add to add the URL and close the Certificate Enrollment Policy Server dialog box.
- Click OK.
Importing the root CA certificate into non-domain endpoints
In the enrollment endpoints outside the Windows Domain, import the certificate of the CA that will issue certificates for the enrollment service.
To import the root CA certificate in non-domain endpoints
- Log in to the non-domain endpoint.
- Open a Command Prompt window. Select Start > Windows System > Command Prompt.
Enter the following command.
certutil -addstore Root <cert_path>Where
<cert_path>is the full path and file name of the CA certificate file.- Open the Certificate Manager snap-in. Select Start > Run, then enter
certlm.msc.
The certlm dialog box appears.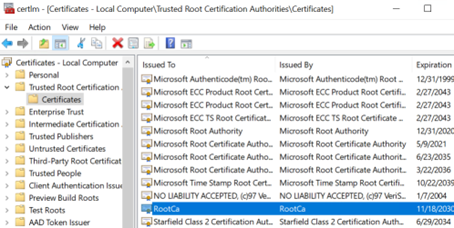
- In the tree view, expand Certificates – Local Computer > Trusted Root Certification Authorities > Certificates.
- In the content pane, verify that the root CA certificate you imported appears in the list of trusted root CA certificates.