Complete the following procedures to transfer Oracle TDE master keys from a production CSP Vault for Databases environment to a test CSP Vault for Databases environment:
TDE master key transfer is supported only between independently installed CSP clusters. You cannot import the same keys into two different vaults within the same CSP cluster. You also cannot import keys into a different vault within the production CSP cluster.
Prerequisite
Before you begin, make sure you have replicated the production database to the test environment using the database replication method appropriate for your environment. For more information about database replication, see your database provider's documentation.
To create a wrapping key KeySet
Create a wrapping key KeySet to store and manage the wrapping key used during TDE master key transfer operations. A wrapping key is a cryptographic key used to protect TDE master keys during transfer between CSP Vault for Databases environments. The production CSP Vault for Databases uses the wrapping key to wrap exported TDE master keys, and the test CSP Vault for Databases uses the corresponding private key to unwrap the imported keys. This allows TDE master keys to be securely transferred between isolated CSP Vault for Databases environments.
- Log in to the test Cryptographic Security Platform Vault for Databases webGUI using an account with Cloud Admin privileges.
- From the menu at the top, select CLOUDKEYS.
From the Actions drop-down list, select Create Key Set. The Create Key Set window appears.
- Under Details, complete the following fields:
- Name: Enter a name for the key set. For example,
wrapping_keys. - Admin Group: From the drop-down list, select Cloud Admin Group.
- Database Type: From the drop-down list, select Generic Key Set.
The Generic Key Set database type is used to create a wrapping key and download its public key. The public key is used to protect TDE master keys during export from the production environment, while the corresponding private key is used to unwrap the imported keys in the test environment.
- Name: Enter a name for the key set. For example,
- Click Continue.
- If you did not configure an HSM for your CSP Vault for databases, a message indicating HSM is not available for this vault appears. Click Apply. A message indicating KeySet was created successfully appears.
To create a wrapping key
Create a CloudKey to serve as the wrapping key used to protect TDE master keys during transfer between CSP Vault for Databases environments. The wrapping key is used to encrypt exported TDE master keys in the production environment and decrypt them after import into the test environment.
- Log in to the test Cryptographic Security Platform Vault for Databases webGUI using an account with Cloud Admin privileges.
- From the menu at the top, select CLOUDKEYS.
- Select the CloudKeys tab.
- From the Key Set drop-down list, select the keyset you created in To create a wrapping key keyset. For example,
wrapping_keys. - From the Actions drop-down list, select Create CloudKey. The Create CloudKey window appears.
- Under Details, complete the following fields:
- Name: Enter a name for the cloud key. For example,
toi_wrapping_key. - Cipher: From the drop-down list, select an algorithm based on your requirements.
Available options:- RSA-2048
- RSA-3072
- RSA-4096
- ML-KEM 1024
- Name: Enter a name for the cloud key. For example,
- Click Continue. The Alerts section of the Create CloudKey window appears.
- If you want the system to send alerts to non-vault administrator users, select Send alert emails to non-vault for user owners.
- Click Apply. The CloudKey Created Successfully window appears.
- Click Close.
To download the wrapping key
- Log in to the test Cryptographic Security Platform Vault for Databases webGUI using an account with Cloud Admin privileges.
- From the menu at the top, select CLOUDKEYS.
- Select the CloudKeys tab.
- In the table, select the CloudKey you created in To create a wrapping key. For example,
toi_wrapping_key. - Click Download Wrapping Key.
The wrapping key is a
.keyfile, which includes the public key.
To export the CloudKey from the production environment
- Log in to the production Cryptographic Security Platform Vault for Databases webGUI using an account with Cloud Admin privileges.
- From the menu at the top, select CLOUDKEYS.
- Select the CloudKeys tab.
- From the Keyset drop-down list, select the keyset from which you want to export TDE master keys.
- From the Actions drop-down list, select Export All CloudKeys. The Export All CloudKeys window appears.
- For Wrapping Key, select Load File. The File Upload window appears.
- Select the wrapping key file that you downloaded from the test Cryptographic Security Platform Vault for Databases in To download the wrapping key.
- Click Open.
- Click Export.
The exported file is a
.keysfile, which includes all the exported keys.
To import the CloudKey to the test environment
- Log in to the test Cryptographic Security Platform Vault for Databases webGUI using an account with Cloud Admin privileges.
- From the menu at the top, select CLOUDKEYS.
- Select the CloudKeys tab.
- From the Keyset drop-down list, select the keyset where TDE keys should be imported.
This keyset must have the same name as the source keyset in the production environment.
- From the Actions drop-down list, select Import CloudKeys. The Import TDE Keys window appears.
- For Key File, select Load File. The File Upload window appears.
- Select the
.keysfile that you exported in To export the CloudKey from the production environment. - Click Open.
- Click Import. The following Confirm window appears.
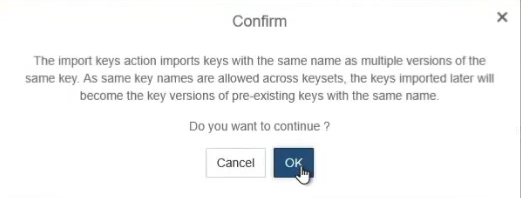
- Click OK. A success message and the CloudKeys Imported Result window appear.
- Click Close.
To set up auto-login
Set up an auto-login wallet on the production database so the keystore opens automatically without a password. Then copy the wallet to the standby database server so the standby database can open the keystore after the TDE master keys are imported.
- On the production Oracle server, run the following command to set up auto-login:
./encrypt.sh setup_auto_login - Copy the wallet from the production database server to the standby database server. For more information, see: Configuring Auto-login for the Keystore using Scripts.
To resynchronize the Data Guard standby database
Resynchronize the Data Guard standby database to restart the Managed Recovery Process.
- On the standby Oracle server, run the following command to set the Oracle/Entrust environment:
./encrypt.sh setenv - Run the following command to resync the standby with the primary and restart the Managed Recovery Process:
./encrypt.sh standby resync